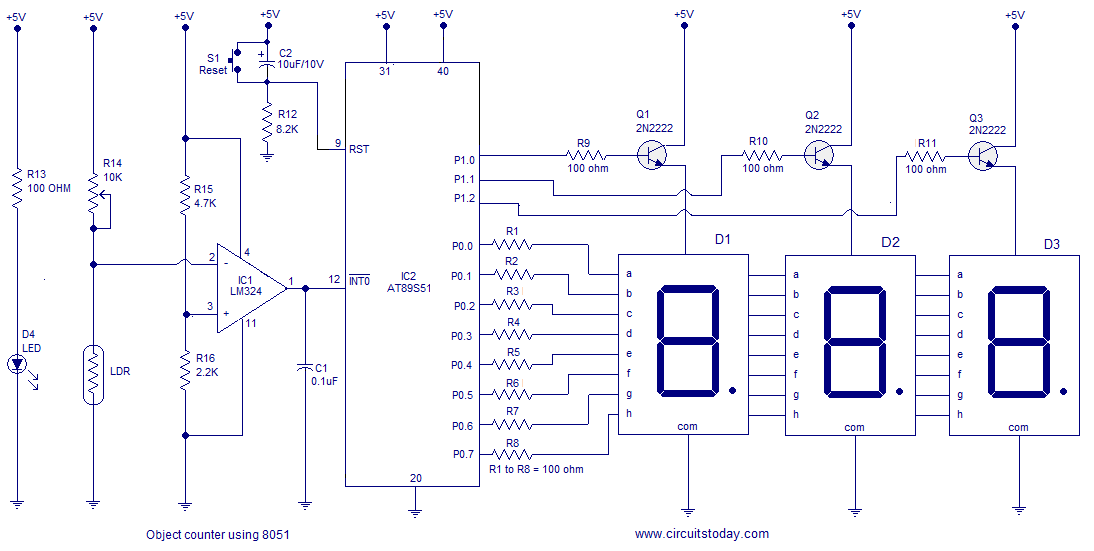
Object counter using 8051 microcontroller.
This article is about a simple object counter/visitor counter using 8051 microcontroller . AT89S51 belonging to the 8051 family is the microcontroller used here. This circuit can count the number of objects passing across a line , number of persons passing through a gate/door and so on. The can be simply divided into two sections i.e. the sensor section and the display section.
Sensor.
The sensor part consists of a ultra bright led (with focus), and LDR, opamp LM324 and the associated passive components. The LED is placed on one side of the door and the LDR is placed on the other side so that the light from the LED falls directly on the LDR.As you know, the resistance of the LDR has an inverse relationship with the intensity of the light falling on it. The preset resistor R14 is so adjusted that the voltage across the LDR is below 1.5V when it is illuminated. This voltage (labelled A in the circuit diagram) is connected to the inverting input of the opamp which is wired as a comparator with reference voltage 1.5V (set using R15 and R16).Capacitor C1 is meant for bypassing noise or anything like that which may cause false triggering.Resistor R13 is meant to control the current through the LED.
Electronics lab , Created by Muhammad Irfan
Electronics lab , Created by Muhammad Irfan
When the light is falling on the LDR the voltage across it will be less than the reference voltage and so the output of the opamp remains high. When the light beam is interrupted, the voltage across the LDR goes above the reference voltage and so the opamp output goes low and it indicates a pass.
Display section.
The output of the opamp is fed to the INTO (interrupt 0) pin of the microcontroller. The microcontroller is programmed to count the number of negative edge pulses received at the INT0 pin and displays it on the three digit seven segment display.
Circuit diagram.
Program.
ORG 000H
SJMP INIT
ORG 003H  // starting address of interrupt service routine (ISR)
ACALL ISR // calls interrupt service routine
RETI

INIT: MOV P0,#00000000B
      MOV P3,#11111111B
      MOV P1,#00000000B
      MOV R6,#00000000B
      MOV DPTR,#LUT
      SETB IP.0     // sets highest priority for the interrupt INT0
      SETB TCON.0   // interrupt generated by a falling edge signal at INT0 pin
      SETB IE.0     //enables the external interrupt
      SETB IE.7     //enables the global interrupt control

MAIN: MOV A,R6
      MOV B,#100D
      DIV AB
      ACALL DISPLAY
      SETB P1.0
      ACALL DELAY
      ACALL DELAY
      MOV A,B
      MOV B,#10D
      DIV AB
      ACALL DISPLAY
      CLR P1.0
      SETB P1.1
      ACALL DELAY
      ACALL DELAY
      MOV A,B
      ACALL DISPLAY
      CLR P1.1
      SETB P1.2
      ACALL DELAY
      ACALL DELAY
      CLR P1.2
      SJMP MAIN

ISR: INC R6     //interrupt service routine
     RET

DISPLAY: MOVC A,@A+DPTR // display sub routine
         CPL A
         MOV P0,A
         RET

DELAY: MOV R3,#255D  // 1mS delay
LABEL: DJNZ R3,LABEL
       RET
LUT: DB 3FH
     DB 06H
     DB 5BH
     DB 4FH
     DB 66H
     DB 6DH
     DB 7DH
     DB 07H
     DB 7FH
     DB 6FH
END
About the program.
The program is written so that, it keeps displaying the current value in register R6 on the three digit seven segment display. When ever there is a valid negative going pulse (interrupt) at the INT0 pin, the program branches to the interrupt service routine (sub routine ISR). Subroutine ISR increments the value in register R6, then jumps back to the MAIN loop and the display gets updated by the new value.
Notes.
Entire circuit can be powered from a 5V DC supply.
LDR must be placed in an enclosure so that the light from LED alone falls on it.
Electronics lab , Created by Muhammad Irfan
Electronics lab , Created by Muhammad Irfan


nice sir
ReplyDelete